Whether handling push notifications, location updates, or sensor events, many useful features require that an application has the ability to handle events without user interaction, even when not running in the foreground.
Executing Dart in the Background with Flutter Plugins and Geofencing
Whether handling push notifications, location updates, or sensor events, many useful features require that an application has the ability to handle events without user interaction, even when not running in the foreground. Up until this point, applications written using Flutter could only handle background events using platform code, and plugins had no way of allowing for plugin users to provide a callback to handle background events in Dart. Basically, if a Flutter user wants to handle background events in an application, they were required to create a platform-specific implementation for each of their target platforms.
Luckily, this is no longer the situation, thanks to the arrival of Flutter support for background execution of Dart code. Having designed much of the Flutter background execution flow, I’m excited to share my experiences developing plugins which take advantage of this functionality, such as the android_alarm_manager and an iOS location event handler, to help you get started creating your own plugins.
Throughout the rest of this article, I’ll explore (in detail) the process of building a Flutter plugin that handles background geofencing events on both Android and iOS. Finally, just for fun, I’ll showcase how I used this geofencing plugin to create a simple application that can be used to open my garage door automatically when I get close to home.
Table of Contents
- Geofencing: defining the Dart API
- Dart background execution
- Background execution: Android (Kotlin)
- Background execution: iOS (Objective-C)
- Usage example: operating a garage door with geofencing
- Conclusion
- Resources
Geofencing: defining the Dart API
Before writing any platform-specific code, I’ll first need to define the Dart API for the geofencing plugin. Since Android and iOS each have their own APIs for registering and handling geofencing events, I want the Dart interface to provide a reasonable geofencing abstraction that is compatible with both platforms. Without going into too much detail about Android and iOS APIs, the following roughly describes the Dart interface that I’ll use for my plugin:
This interface provides the following functionality to users of the plugin:
- The ability to create instances of
GeofenceRegion, which contain the coordinates and radius of a geofence, a unique ID, and a list of geofencing events to listen for. Since Android provides a richer set of options for defining geofences than iOS, Android-specific options are made available through the optionalandroidSettingsproperty. GeofencingPlugin.registerGeofenceallows for the registration of aGeofenceRegioninstance with a callback that is invoked when a geofence event for that region is received.GeofencingPlugin.removeGeofenceandGeofencingPlugin.removeGeofenceByIdunregister aGeofenceRegionfrom triggering additional events.
Overall, this interface is rather simple and (mostly) platform agnostic, making the plugin easy to use on both Android and iOS.
Dart background execution
This section covers how to set up your isolate for background execution. You will learn how to reference callbacks, and how to use the callback dispatcher.
Referencing Callbacks
Now that the Dart interface defined, start adding plumbing to communicate with the platform-specific portions of the plugin. For example, the following code initializes the geofencing plugin and registers the geofences:
If you’ve previously developed Flutter plugins and are familiar with MethodChannel, this should look as expected, for the most part. (If you’re new to plugin development, check out the platform channels article for an introduction). However, the two calls to PluginUtilities.getCallbackHandle might stand out.
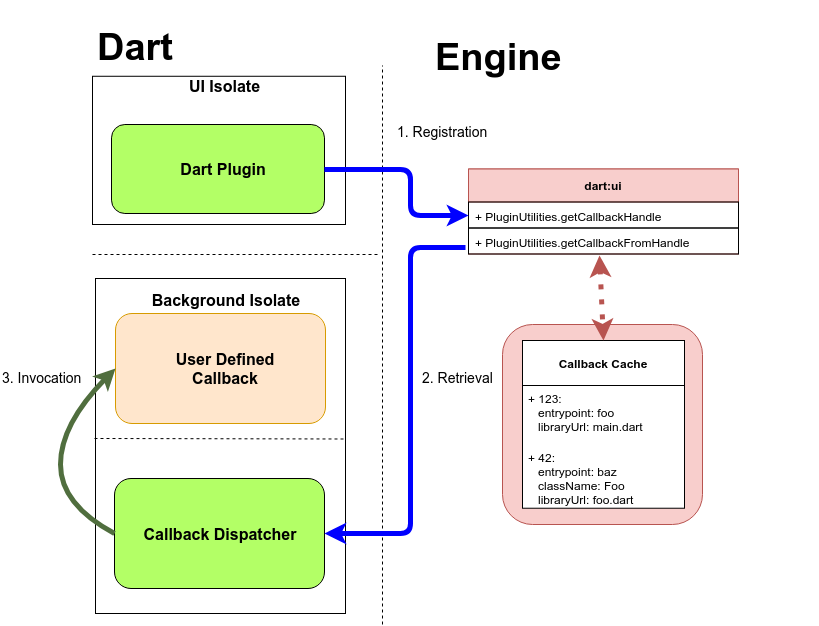
In order to invoke a Dart callback as a result of a background event, you must retrieve a handle that is passed between Dart and platform code while also allowing for lookup of the callback across platform threads and Dart isolates.
Aside: Retrieving a CallbackHandle for a method from PluginUtilities.getCallbackHandle has the side effect of populating a callback cache within the Flutter engine, as seen in the diagram above. This cache maps information required to retrieve callbacks to raw integer handles, which are simply hashes calculated based on the properties of the callback. This cache persists across launches, but be aware that callback lookups may fail if the callback is renamed or moved and PluginUtilities.getCallbackHandle is not called for the updated callback.
In the code above, two instances of CallbackHandle are obtained: one for the callback, which is associated with a GeofenceRegion, and another for a method of the name callbackDispatcher. The callbackDispatcher method, the entrypoint of the background isolate, is responsible for preprocessing raw geofence event data, looking up callbacks via PluginUtilities.getCallbackFromHandle, and invoking them for registered geofences.
The Callback Dispatcher
As mentioned at the end of the previous section, I’ll use a pattern that I refer to as the callback dispatcher to create the entrypoint for the geofencing plugin’s background isolate. This pattern allows for performing the initialization required to establish communication channels with platform code while also allowing for the creation of non-trivial interfaces for callback methods. For this geofencing plugin, the callback dispatcher implementation is as follows:
As you can see, on the invocation of callbackDispatcher (upon the creation of the geofencing plugin’s background isolate), only four operations are performed. First, a MethodChannel is created for listening to events from the plugin. Next, WidgetsFlutterBinding.ensureInitialized() is called to initialize state needed to communicate with the Flutter engine. At this point, the MethodCall handler is set to process plugin events before finally alerting the platform portion of the plugin that the background isolate is initialized and ready to start handling events.
Once the plugin starts sending events to the callback dispatcher, the callback provided by the plugin user can be invoked. First, PluginUtilities.getCallbackFromHandle is called to retrieve an instance of the callback associated with the triggered geofencing event using the raw callback handle. Next, the raw arguments from the MethodCall are refined into:
- An instance of
List<String>for the IDs of the geofences that were triggered - An instance of
Locationdescribing the current location of the device - An instance of the
GeofenceEventenum that represents whether the device has entered, exited, or dwelled within the triggered geofences.
Then provide this info as arguments to our callback.
Important Note: You may have noticed that no state is kept within the callback handler. This is because there is no guarantee that the background isolate will stay alive while the application itself is backgrounded. Both Android and iOS have lifecycle policies that can result in background services or execution being killed, meaning that the background isolate may be destroyed and then recreated the next time the application is woken up. As a result, best practice avoids storing volatile state in either the callback handler or user-provided callbacks.
At this point, we now have all of the Dart code needed for the plugin! Now, onto the platform-specific portion of the geofencing plugin.
Background execution: Android (Kotlin)
For the Android implementation of the plugin, I’ll need to implement the following classes:
- The
GeofencingPluginclass, which is registered with the Flutter engine in order to receive and handle method calls made from Dart code - A
GeofencingBroadcastReceiver, which is invoked by the system on a geofence event - The
GeofencingService, which creates the background isolate, initializes the callback dispatcher described earlier, and processes geofence events before invoking the callback dispatcher.
This trinity of 1) plugin, 2) broadcast receiver, and 3) service classes is a common pattern for plugins on Android, so it is worth becoming familiar with it. Although I’ve decided to use Kotlin for this plugin, everything here can also be implemented using Java.
GeofencingPlugin
As previously mentioned, the main purpose of the GeofencingPlugin is to process requests from Dart code and then register or remove geofences based on the contents of said request.
Creating Geofences
In order to handle requests, create an instance of MethodChannel on the same channel from earlier, and then register an instance of GeofencingPlugin with this new channel:
In order to manage these requests, onMethodCall needs to be overridden:
Finally, I’ll add the ability to register geofences (removing geofences is relatively trivial, so I’ll focus on adding geofences in this article):
There’s a lot going on here, so let’s break this down:
- Pull the relevant arguments out of the
ArrayListsent over theMethodChannel - Create an instance of
Geofencethat describes the location and size of the geofence as well as its various trigger parameters - Before registering the
Geofenceinstance, do another check to ensure that the application still has the correct device permissions for geofencing - Finally, a
GeofencingRequestas well as aPendingIntentare created and used to register the geofence. ThePendingIntentis used to invoke theGeofencingBroadcastReceiverwhen the geofence is triggered; it contains the callback handle associated with that geofence.
That’s it! At this point the plugin can create and register a geofence. However, the plugin is not yet ready to handle actual geofence events. For that, the plugin needs to be able to be woken up by the system when there is a geofence event to be handled.
Scheduling the geofencing service
Now that the plugin can register geofence events, it also needs to be able to handle the events themselves. When a geofence registered by the plugin is triggered, Android starts the Flutter application in the background, creates an instance of GeofencingBroadcastReceiver, and invokes the overridden onReceive method:
The onReceive implementation is simple: it ensures that the Flutter framework is initialized and then adds the Intent for the geofencing event to the GeofencingService’s work queue. Since GeofencingService is an implementation of a JobIntentService, GeofencingService.enqueueWork is simply a wrapper around the enqueueWork method in JobIntentService, which handles scheduling the work for the service.
Handling Geofence Events
At some point after a geofence event is added to the work queue, Android wakes up the application to invoke GeofencingService’s onHandleWork method. However, before onHandleWork can be called, an instance of GeofencingService must be created and initialized by invoking startGeofencingService from GeofencingService’s onCreate method.
startGeofencingService is responsible for ensuring that the plugin has a headless FlutterNativeView, which has the important task of initializing the callback dispatcher, and executing the callbacks registered with the plugin.
After startGeofencingService is done executing, onHandleWork is called by the system with the Intent that was queued up earlier:
Most of the above code builds the argument list which is sent to the callback dispatcher. However, before passing the processed geofence event arguments to the callback dispatcher, the plugin must ensure that the callback dispatcher has started listening on its MethodChannel. To achieve this behavior, the GeofencingService listens for a message from the callback dispatcher, which is sent after the MethodCall handler for the dispatcher is set:
At this point, the GeofencingService is completely initialized and any geofencing events that have queued up are sent to the callback dispatcher.
Background execution: iOS (Objective-C)
Now that the geofencing plugin implementation for Android is finished, the same geofencing functionality needs to be implemented for iOS.
Initializing the plugin
One of the first tasks performed by the Flutter engine at startup is registering and initializing all plugins used by the application. On iOS, this involves invoking the static registerWithRegistrar method defined for each plugin. For the geofencing plugin, initialization involves creating an instance of GeofencingPlugin and registering it as an application delegate as seen in the code snippet below. This allows for the Flutter engine to delegate handling of certain events to the plugin.
Additional state for the plugin is set when the GeofencingPlugin instance is created during plugin registration:
FlutterHeadlessView's isolate, but this will be fixed in the near future (issue #21925) .Starting the callback dispatcher
Once initialization of internal state is complete the callback dispatcher needs to be started by invoking startGeofencingService. This is either done when the user calls GeofencingManager.initialize() in their application or when the application is started to handle a geofence event (more on this later).
Note: the FlutterMethodChannel for the callback dispatcher is only registered after the headless runner has been started. If an attempt to register the callback dispatcher’s method channel is made before this is done, the application will likely crash.
Handling method calls
Similar to how onMethodCall needed to be implemented on Android to allow for the plugin to handle requests from the Dart interface and callback dispatcher, handleMethodCall must be implemented:
Registering geofences
With initialization completed, the plugin is ready to register for geofence events. When the plugin user requests for a geofence to be set, registerGeofence is called:
This method creates the geofence region and uses the CLLocationManager’s startMonitoringForRegion method to register the geofence. In order to keep track of which callback is associated with the newly registered geofence, the callback handle is mapped to the region’s user provided identifier which is stored to disk using NSUserDefaults. Doing this allows for the plugin to lookup the callback handle when a geofence event is received, even if the application had been closed since the geofence was registered.
Handling geofence events
Once the system determines that a geofence has been entered or exited, the CLLocationManager invokes one of didEnterRegion or didExitRegion. At this point, the callback handle for the geofence which was triggered is retrieved from storage and the callback dispatcher is invoked:
Geofence events in a suspended state
If you are familiar with developing applications for both Android and iOS, you’ll probably know that iOS is much more restrictive than Android when it comes to executing code in the background. Instead of spawning potentially long-running services to handle background events, iOS allows for applications to register for specific types of events which, when received, wake up the application and invoke any relevant delegates. Since the FlutterPlugin protocol allows for plugins to be registered as delegates, it’s relatively simple to handle any background event provided by the system.
For geofencing, the plugin needs to implement didFinishLaunchingWithOptions which is invoked when the application has just been started and is ready to run. The dictionary parameter of this method will contain UIApplicationLaunchOptionsLocationKey if the application was launched due to a geofence event.
If the application is launched as the result of a geofence being triggered, the callback dispatcher for the plugin will still need to be initialized by calling startGeofencingService with the cached callback dispatcher handle. After returning from this method, the location manager will invoke the appropriate handler described in the previous section for the geofence event.
Usage example: operating a garage door with geofencing
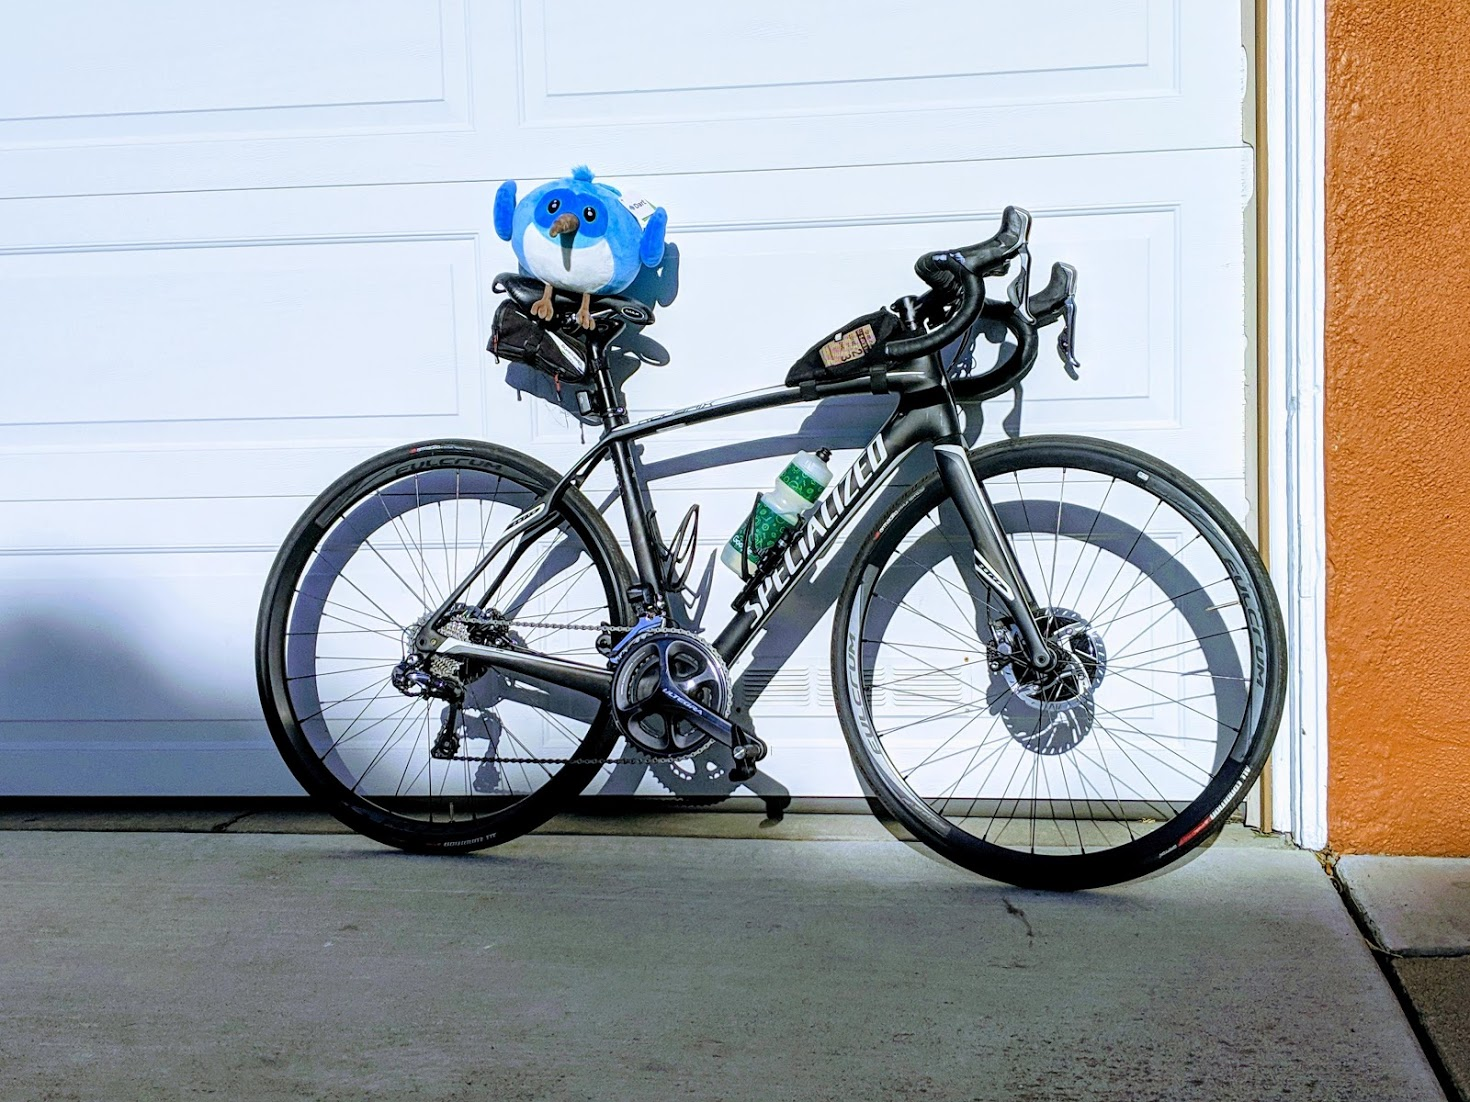
Now that the geofencing plugin is fully implemented for both Android and iOS, I can finally put it to good use: automatically opening my garage door as I pedal towards my house!
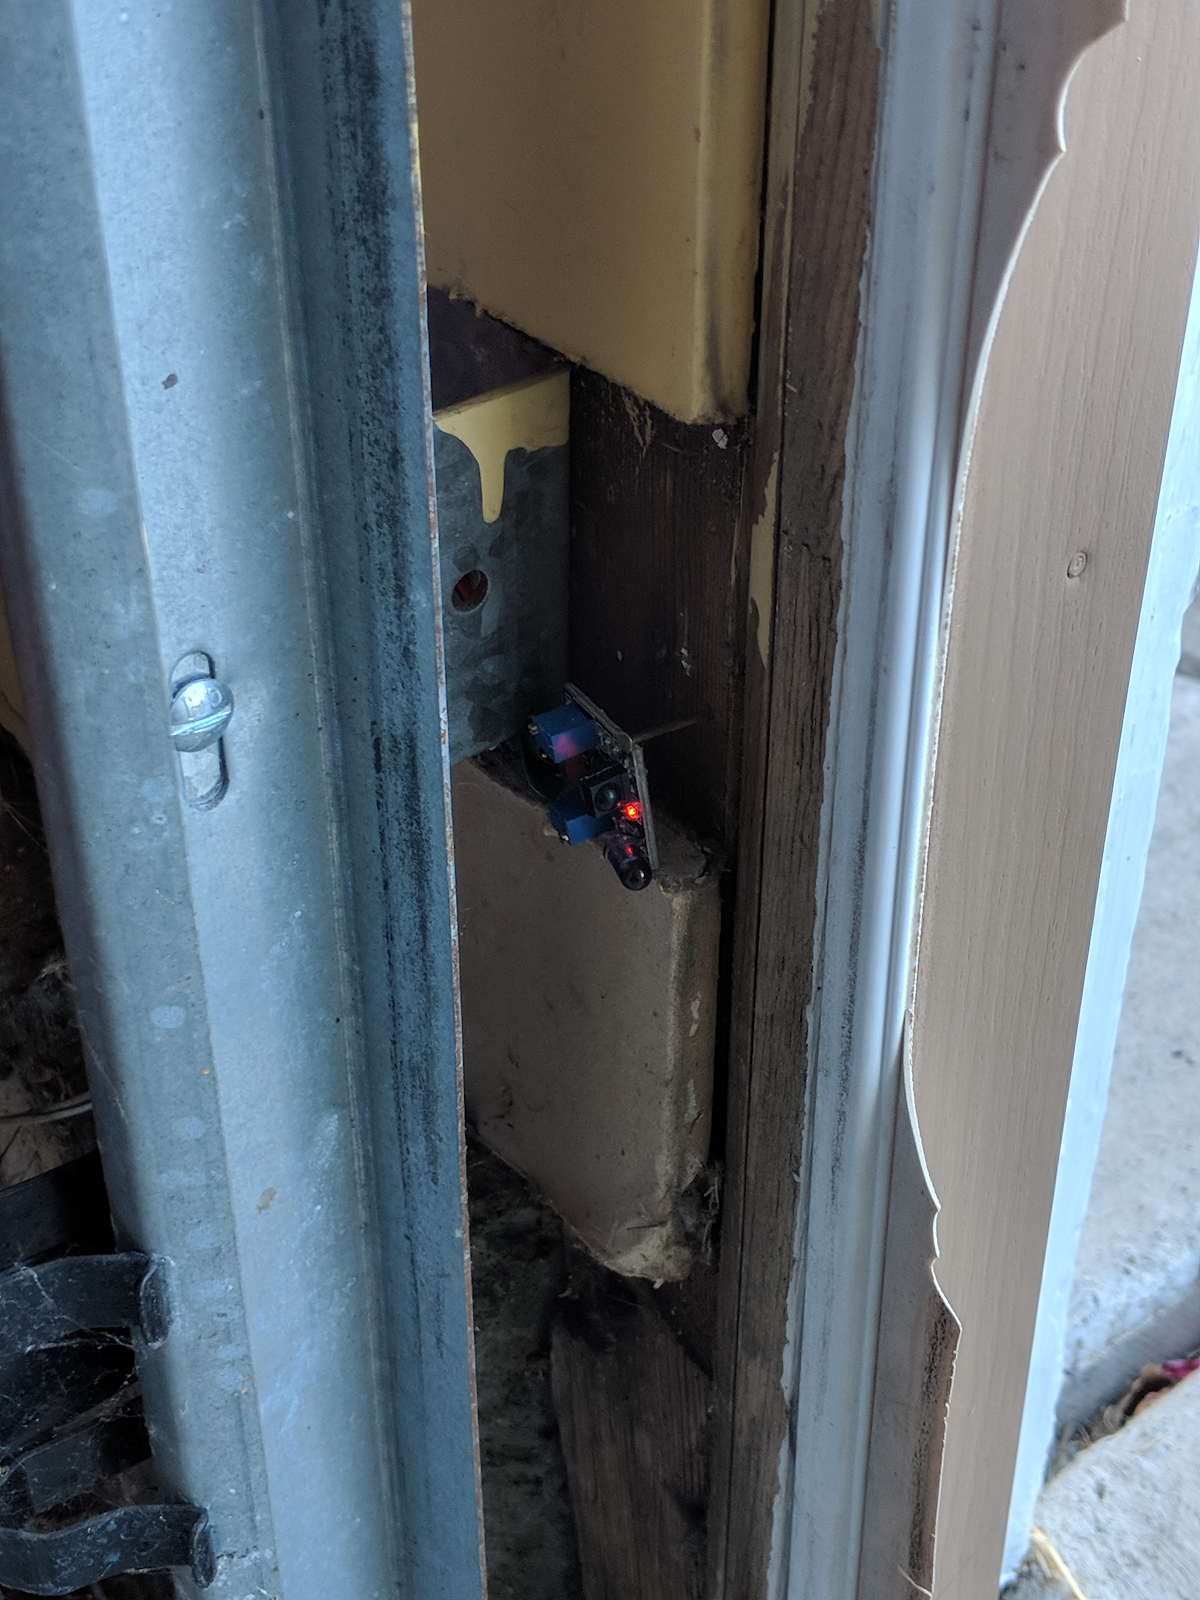
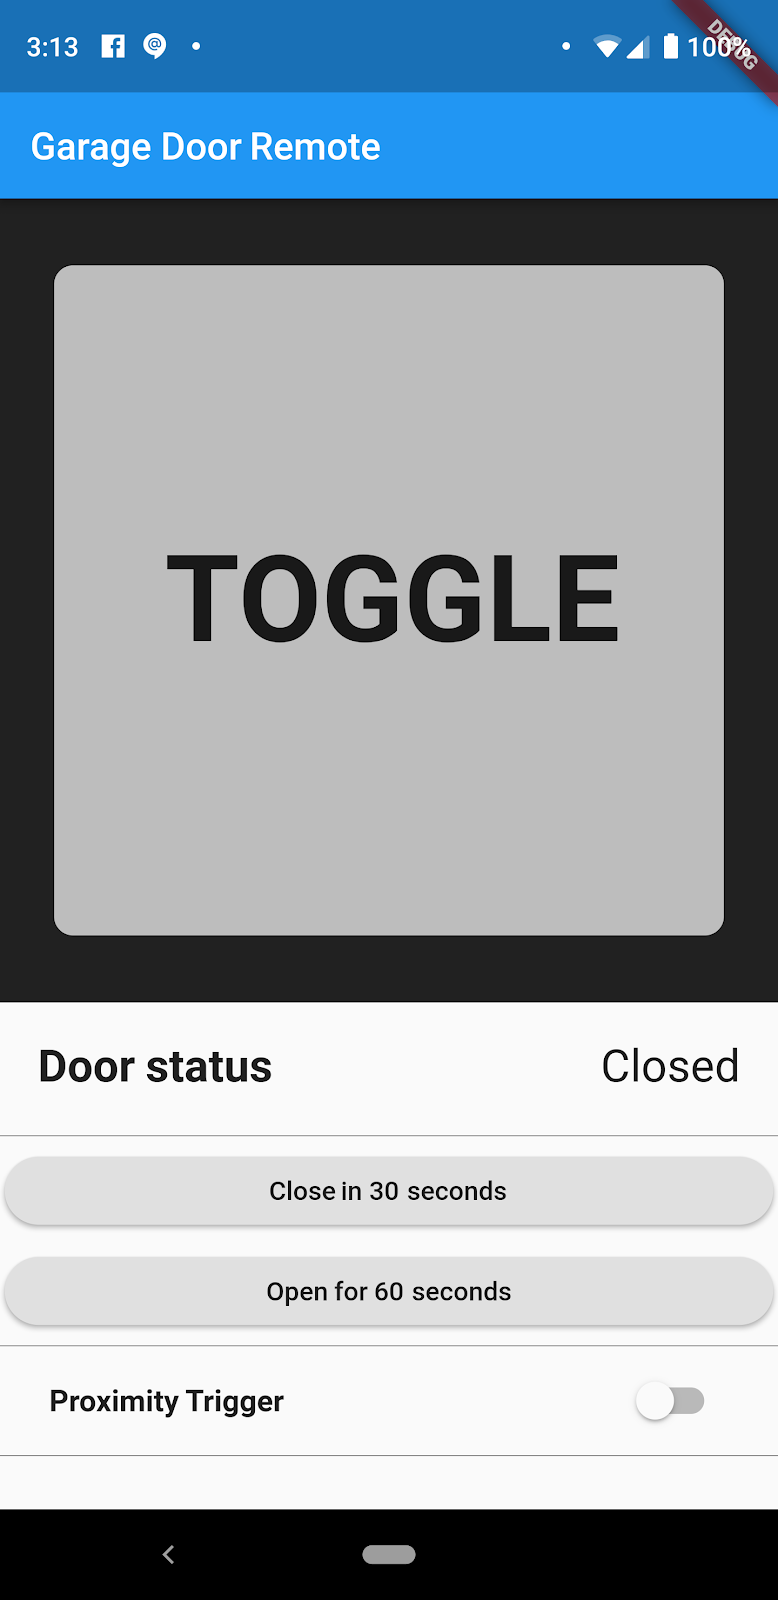
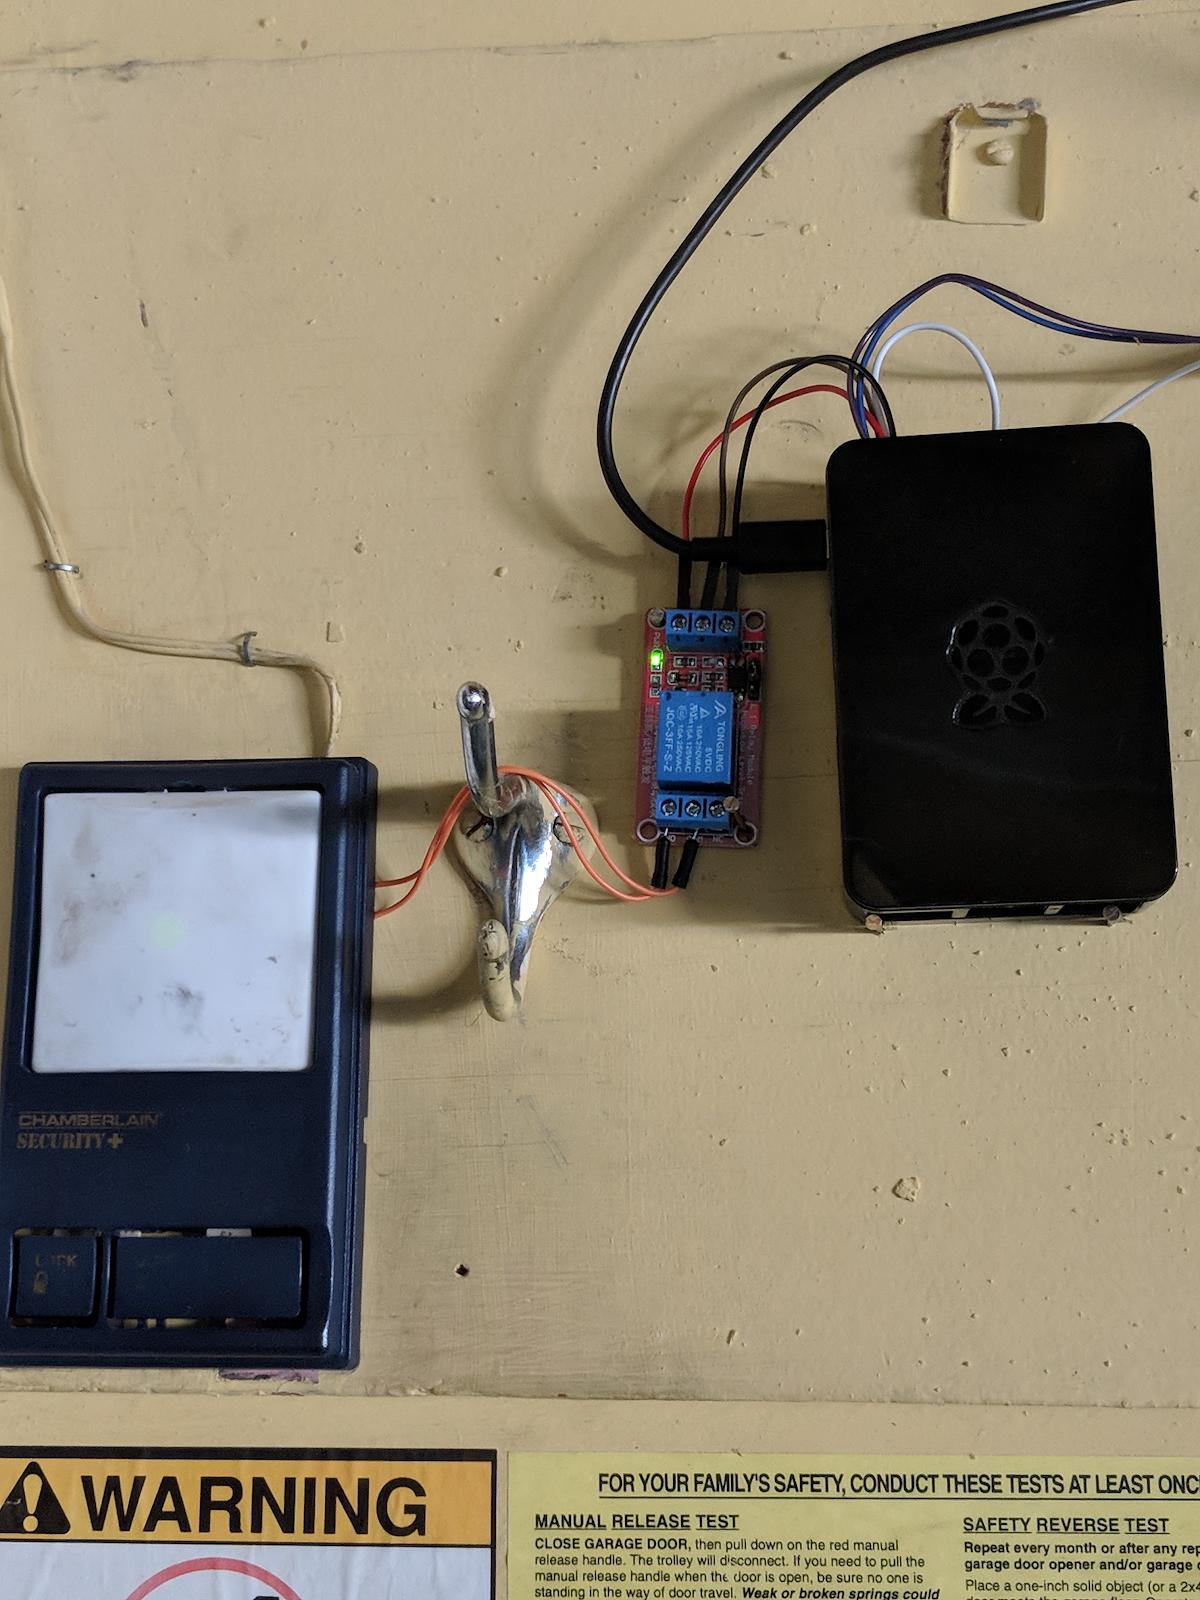
Over the past couple of months I’ve been tinkering with a Raspberry Pi and the Dart rpi_gpio package to get back into working with circuits. I had been toying around with the idea of making a Flutter application that would open my garage door for quite awhile, so it made sense for my first hardware project to use Dart and Flutter. Over a couple of weekends, I wrote a service to control the garage door, performed minor surgery to wire a relay across the opener button, installed a proximity sensor to query the state of the door, and finally wrote a simple application using Flutter that functions as a remote control.
After using my solution for a couple of weeks, I was becoming annoyed. Although it was great that I could open the garage with a mobile application, I still had to pull out my phone, open the app, and then manually trigger the door. This is particularly painful for me since fingerprint readers apparently don’t like to work when covered in sweat, making it difficult to unlock my phone (I don’t have a car and I commute 15km each way by bike, so fingerprint reader struggles are a daily occurrence).
Luckily for me, Flutter now has a geofencing plugin that can perform tasks even while the application isn’t open, including opening my garage door!
Setting the right permissions
The first thing I’ll do is ensure that my application has the right permissions to use the geofencing plugin.
Permissions: Android
In order for the geofencing plugin to run in the background, GeofencingBroadcastReceiver and GeofencingService need to be registered in AndroidManifest.xml:
Geofencing on Android also requires the ACCESS_FINE_LOCATION permission to be requested in AndroidManifest.xml:
Also add the following class in the same directory as MainActivity.java and name it Application.java:
The purpose of extending FlutterApplication is to set a reference to the application’s plugin registrant within GeofencingService. This is needed to register the application’s plugins with the geofencing plugin’s background isolate, which makes it possible to use other plugins in the context of that isolate.
Finally, set the following field in AndroidManifest.xml to use the new Application instead of the default FlutterApplication:
Permissions: iOS
Requesting the relevant permissions on iOS requires some simple modifications to Info.plist in the ios directory of the application. First, add the following lines to request background location updates:
Then set the NSLocation description messages:
These descriptions are shown to the user when the application requests access to their location. If they’re not provided, geofencing registration will fail silently!
Bringing it all together
Now that the permissions required for geofencing have been set correctly, all that’s left to do is wiring the plugin into the garage door remote application.
First of all, the plugin needs to be initialized. This is done in a method named initialize, which is invoked when the application starts:
Next, there should be some way to toggle whether or not the garage door should open when the geofence is entered. This can be accomplished with a simple Switch displayed at the bottom of the application:
Depending on the state of this Switch, the application either registers a geofence with the callback used to open the garage door, or removes the geofence.
Finally, the geofence region around my home and its corresponding callback are defined in GeofenceTrigger:
For my initial tests I created a GeofenceRegion with a radius of 300m around my home that will trigger at some point after I enter the area. Once the geofence is entered the homeGeofenceCallback is invoked, checks are performed to ensure the application can communicate with the garage door server, and then a request to open the door is sent. Once I confirmed that the logic within the callback actually triggered the garage door to open using a third-party application to mock my location and movements, it was time to do some real world testing on my bike!
After a few trips up and down the street it became apparent that, although geofences are triggered almost immediately when using a mocked location, Android provides no guarantees as to when a geofence event is delivered. Unfortunately, this means that it can potentially take minutes before my garage door remote is notified that I’ve entered the geofence region around my home. With a radius as small as 300m, I often found myself waiting a minute or two for the door to open on its own.
The temporary fix for this was to increase the radius of the geofence region to 1km, which seems to work well enough for now. Obviously, there’s some issues with this approach, but I plan on further refining the proximity triggering logic to use a larger geofence that will start more frequent location updates. These location updates will then be used to manually determine whether I’m within a certain radius of my house, at which point the request to open the door will be sent.
Conclusion
If you’ve made it this far you should now have all the knowledge you need to create a Flutter plugin that executes Dart code in the background! Of course, I was only able to scratch the surface of plugin development for Flutter in this article but I would highly recommend the documentation for developing packages and plugins as well as the walkthrough for writing custom platform-specific code with platform channels. If you want a deeper look into how the geofencing plugin is implemented, the full source can be found in the FlutterGeofencing repo on GitHub. I’ve also linked to all the additional documentation, sample plugins, and projects mentioned throughout this article in the Resources section below.
I’ve had a lot of fun implementing background execution support for Flutter, and even more fun creating the geofencing plugin for this article. (It was a wonderful excuse to work on a personal project as part of my job!) If you feel so inclined, follow me on GitHub to keep up with my work on Flutter and the Dart virtual machine, as well as my other pet projects.
Thanks for reading and happy Fluttering!
Resources
Docs for Dart:
- PluginUtilities: contains methods for dealing with CallbackHandles
- IsolateNameServer: establishing communication between foreground and background isolates using named SendPorts
Docs for Android:
- FlutterNativeView: allows for spawning a background isolate
- FlutterCallbackInformation: lookup callback information needed for starting a background isolate using callback handles
Docs for iOS:
- FlutterHeadlessDartRunner: allows for spawning a background isolate
- FlutterCallbackCache: lookup callback information needed for starting a background isolate using callback handles
Sample Plugins:
- FlutterGeofencing: the geofencing plugin created for this article
- android_alarm_manager: an AlarmManager plugin for Flutter
- location_background: plugin for listening for significant location changes on iOS
Projects referenced:
- rpi_gpio: package for accessing the Raspberry Pi GPIO pins.
- FlutterGarageDoorOpener: garage door remote control using Flutter
- GarageDoorController: the garage door controller library and service
");})()